🎉🎊 We Are Revamping! Finally! 🎊🎉
After getting so much support and love from you guys ❤️,
I decided to start a new blog.
We are migrating from Blogspot to a WordPress based personal website/blog!
So this blog will be archived from now onwards and will no longer be updated.
For all the new blog posts & exciting things bookmark my new blog/website.
!! These are the new links !!
Hoping for lots of support and love from you all ❤️
Stay Tuned 😉
This is the 6th post on the Raspberry Pi tutorial.
If you want the list of posts click here.
Many of you must be wondering why this separate post for connection? Well, there are some complications when you don't have a router & you connect the Raspberry Pi to the Laptop/Computer directly. Let's take a brief look at the complication :)
Explanation somewhat goes this way, the Router has something called DHCP [Dynamic Host Configuration Protocol]. DHCP in layman's language is a method that allocates IP addresses to any device which will be connected to it. So when we connect raspberry pi to the router it assigns an IP address to it and using this address we can communicate with raspberry pi.
The problem arises when we connect the Raspberry Pi to Laptop/Computer. The IP address is not assigned to the Raspberry Pi, so we are not able to communicate with it. Just to mention we might see an IP address if we go to 'Network Adapter Settings' in windows, but unfortunately, we cannot establish a connection using this [Reason is not known to me :-P, comment if you know the answer :)]. Since the IP is not assigned to the RPi we need to assign a static IP address to the RPi.
Assigning Static IP Address to Raspberry Pi:-
- Remove the SD card from the raspberry pi and using a card reader connect it to a computer/laptop.
- You will see a partition named 'boot'. This partition will be very small, i.e. very less than your SD card size. [Don't worry the remaining partition is Linux based format & hence is not visible on windows computer].
- Open the Cmdline.txt file which is present in the Boot partition. [OPEN THIS TXT FILE USING NOTEPAD++ ONLY].
- Now decide the IP address that you want to allot to the Raspberry Pi. The IP address should lie between 169.254.0.0 – 169.254.255.255. i.e 169.254.xxx.xxx.
- I will recommend to assign it as 169.254.3.14, last two digits indicate 3.14 i.e. Pi :) This will be easy to remember :)
- Now the reason for using 169.254.xxx.xxx is because the computers allot the clients IP address between this range. So we will just use any number between this range to establish a connection between computer/laptop and Raspberry Pi.
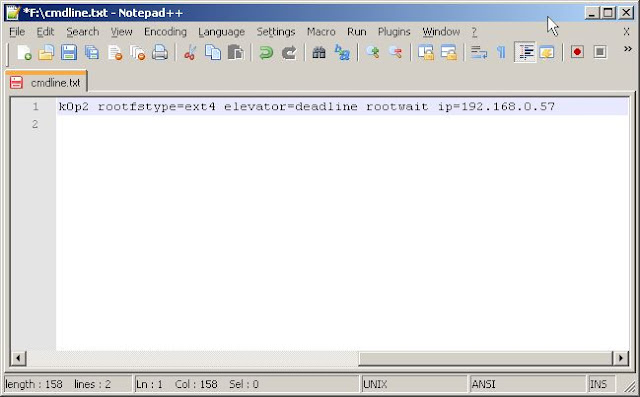
- Now we need to type the IP address in the cmdline.txt file, so we will type the following string at the end of the cmdline.txt "ip = 169.254.3.14". Type that string without any inverted commas.
- It should look somewhat like this:-

- Once done with this we are finished! Just enter the card into the Raspberry Pi and connect it to the Computer/Laptop and proceed with this post:- here.
NOTE:-
- Once you have edited the cmdline.txt file you cannot connect the Raspberry Pi to the Router. You will have to connect the Raspberry Pi directly to the computer/laptop.
- Revert the changes and then connect them to the router if you want to use the router as an intermediate between Raspberry Pi and Computer/Laptop.
- USE NOTEPAD++ FOR EDITING :)
Doubts and suggestions are welcomed in the form of comments.
Thank you for reading.
Follow my blog & stay tuned :)


